Assassins creed: Brotherhood
- Thread starter argoni
- تاریخ آغاز
You are using an out of date browser. It may not display this or other websites correctly.
You should upgrade or use an alternative browser.
You should upgrade or use an alternative browser.
گزینههای بیشتر
مشارکت کنندگان در این گفتگو
سلام
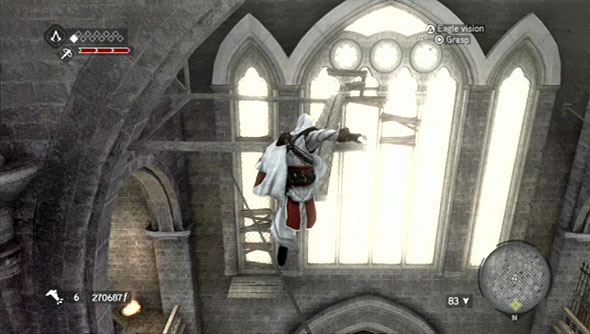
همانطور که در مجموعه عکس های اینجا مشخصه، اول باید با Hidden Gun اون کیسه کنار صلیب رو مورد هدف قرار بدی. این کارو در و راهی باز میکنه که به پلتفرم بالاتری بری. با کمی جنگولک بازی به کیسه دوم میرسی (چون هیچ راه دیگری وجود ندارد، مطمئنم که خودت پیداش میکنی)(عکسشم که گذاشتم)
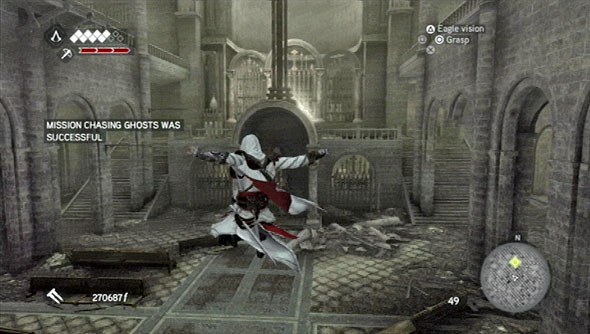
حال از اونجا شیرجه بزن پایین و دوباره همون مسیر رو ادامه بده به طبقه دوم برو. حالا از راه جدیدی که باز شده، به سمت کیسه سوم برو و بهش شلیک کن. بقیه ماجرا هم که مشخص است.")
حال از اونجا شیرجه بزن پایین و دوباره همون مسیر رو ادامه بده به طبقه دوم برو. حالا از راه جدیدی که باز شده، به سمت کیسه سوم برو و بهش شلیک کن. بقیه ماجرا هم که مشخص است.
مشکل
سلام .خسته نباشید.من یه مشکلی تو بازی دارم
اون علامت بالا سمت چپ که یک علامت هست و دورش یه کادره و وقتی با گارد ها درگیر میشی و از مردم پول میدزدی به رنگ قرمز پر میشه.کنار منوی health رو میگم.برای کم کردنش هم یا باید پوستر های روی دیوار رو بکنی.یا اون جاسوس ها رو گیر بندازی یا به سخنران ها پول بدی.
من یه مدت که بازی کردم دیدم دیگه پر نمیشه.به نظر من خیلی خوبه که پر نمیشه. ولی به طور موقت برای گرفتن یک ترافی یا آچیومنت که باید یه کیسه پول به سخنران بدی و دوباره ازش بدزدی لازمش دارم.و میخوام که پر بشه.لطفا راهنمایی کنید که چرا دیگه با دزدی از مردم پر نمیشه.من این بازی رو روی کامپیوتر برادرم هم نصب کردم و سیو خودم رو دادم بازی کنه.روی کامپیوتر اون هم اول پر نمیشد ولی امروز صبح بلند شدم دیدم که داره پر میشه. و نمیدونه چیکار کرده.لطفا راهنمایی کنید.فکر میکنم باگ بازی باشه.کسی تا حالا این مشکل رو نداشته.
وقتی همه مغازه های داخل بازی رو بخری، مادرت بهت شنل مخصوص خاندان آودیتوره رو میدی که Notority رو بالا نمیبره. میتونی با گاردها هم بجنگی اما تحت تعقیب قرار نمیگیری. شاید مشکلت از این باشهسلام .خسته نباشید.من یه مشکلی تو بازی دارم
اون علامت بالا سمت چپ که یک علامت هست و دورش یه کادره و وقتی با گارد ها درگیر میشی و از مردم پول میدزدی به رنگ قرمز پر میشه.کنار منوی health رو میگم.برای کم کردنش هم یا باید پوستر های روی دیوار رو بکنی.یا اون جاسوس ها رو گیر بندازی یا به سخنران ها پول بدی.
من یه مدت که بازی کردم دیدم دیگه پر نمیشه.به نظر من خیلی خوبه که پر نمیشه. ولی به طور موقت برای گرفتن یک ترافی یا آچیومنت که باید یه کیسه پول به سخنران بدی و دوباره ازش بدزدی لازمش دارم.و میخوام که پر بشه.لطفا راهنمایی کنید که چرا دیگه با دزدی از مردم پر نمیشه.من این بازی رو روی کامپیوتر برادرم هم نصب کردم و سیو خودم رو دادم بازی کنه.روی کامپیوتر اون هم اول پر نمیشد ولی امروز صبح بلند شدم دیدم که داره پر میشه. و نمیدونه چیکار کرده.لطفا راهنمایی کنید.فکر میکنم باگ بازی باشه.کسی تا حالا این مشکل رو نداشته.
شما برو توی منو، قسمت inventory و شنل رو با دکمه Ctrl (در pc) حذف کن.
پ.ن: دزدی از مردم که Notority تقریبا اضافه نمیکنه. شما یه گارد بکش :d
تشکر
ممنون از پاسخ آقای ДmirД†m.
فقط یه سوال دیگه هم در مورد آچیومنت ها داشتم.3 تا آچیومنت هست که من نمیتونم انجامش بدم
gps:complet the da vinci disappearance
airstrik:kill 10 guards with a single arrow storm
strongarm:throw a long weapon.heavy weapon.and smok bombs more than 10 m at a guard
در مورد اولی میخواستم بدونم که باید بازی da vinci disappearance رو بخرم و نصب کنم تا این باز شه.چجوریه
در مورد دومی هم:من این کار رو سعی کردم بکنم.رفتم 10 تا گارد دور خودم جمع کردم(حتی بیشتر)بعد از single arrow storm یعنی فرود آوردن تیرکمان از طرف اساسین ها به دشمن استفاده کردم.ولی 8 نفر بیشتر مورد اصابت قرار نمیگیرن.چند بار هم امتحان کردم.ممکن نیست که منظورش این باشه وقتی که دشمن دنبالت نیست 10 تا سرباز یه جا پیدا کنی و این کارو انجام بدی.
درمورد سومی هم از نطر لغوی متوجه میشم ولی نمیدونم باید چیکار کنم.منطورش از لانگ وپن همون نیزه های نیزه دار هاست؟باید هر کوردوم از این 3 تا اسلحه رو یعنی اسلحه های سنگین.اسلحه های دراز.و بمب دودزا رو 10 بار روی یک گارد انجام بدم.چه جوری؟ترفندی داره
منتظر جواب از شما دوستان عزیز و فعال هستم
سوالی دیگر
ببخشید گفتم حالا که دوستان دارن همت میکنن 3 تا مشکل دیگه که با آچیومنت ها دارم رو مطرح کنم.
high roller:win 10000 florin playing hazard
rom global enconomy
clowing around
در مورد اولی:این hazard به معنی قمار کجاست.همون جایی که میریم طبقه ی زیرزمین خونه ی رفیقمون و دعوا میکنیم.
در مورد دومی:این آچیومنت 3 تا قسمت داره که مدال طلا.نقره و برنز داره.که هر کودومش میگه مقدار بیشتری بدست بیاری.این پول رو که میگه رو باید جایی سرمایه گزاری کنیم؟
در مورد سومی هم:میدونم چی داره میگه 5 تا دلقک در جاهایی از بازی وجود دارن که باید روشون حرکت بریم.من از اینترنت یه سیو صددرصد پیدا کردم و اونو بازی کردم.دلقک ها در مکان هایی حضور داشتن ولی الآن وقتی توی سیو 95 درصد خودم دنبالشون میگردم نیستن.جاهایی که حضور دارن رو هم حفظ هستم.باید کاری کنم تا بیان؟
با تشکر
ببخشید میخواستم بدونم که بازی The Da Vinci Disappearance یه بازی مستقل و جداست یا وقتی نصبش میکنی به assassins creed brotherhood پچ میشه.یعنی برای نصب این بازی لازمه که خود بازی برادرهود نصب باشه.یه ذره در مورد این بازی توضیح بدید.
اون چیزی نیست که بخواد نصب یا دانلود بشه
شما وقتی بازی رو به صورت اورجینال داشته باشین وقتی وارد Uplay میشین با توی بخش Rewards با انتخاب کزینه Readm میتونین اونو اضافه کنین به بازی
درواقع توی خود بازی وجود داره و توسط Uplay فعال میشه و در قسمت Single Player میتونین بازی کنین
این dlc بالقوه نصب میشه اما نیازه که بالفعل دربیاد. یعنی فعال بشهببخشید کسی نیست به 2 پست بالای من پاسخ بده.در مورد آچیومنت ها.
گروه skidrow مدتی پس از کرک بازی، آپدیتی برای فعال کردن dlc ایجاد کرده.
از آنجا که قرار دادن لینک دانلود خلاف قوانین سایت است، فقط کافی است اون رو سرچ کنید.
سلام دوستان
من یه مشکل با قسمت the truth دارم
شماره سه اوئنجا که باید از رو عکس رمزشو پیدا کنی اصلا کار کردن با اون چیزی
که رمز رو وارد میکنی رو بلد نیستم !!!!
و کسی جای دقیق همه the truth رو میدونه؟
راهنمایی کنین ممنون میشم
من یه مشکل با قسمت the truth دارم
شماره سه اوئنجا که باید از رو عکس رمزشو پیدا کنی اصلا کار کردن با اون چیزی
که رمز رو وارد میکنی رو بلد نیستم !!!!
و کسی جای دقیق همه the truth رو میدونه؟
راهنمایی کنین ممنون میشم
خیرببخشید موقع لاگین در صفحه ی اول بازی.همونجایی که آفلاین مود رو انتخاب میکنیم.من یوزر نیم و پسووردم تو سایت یوبی سافت رو میزنم.قبول میکنه.ولی یه شماره سریال میخواد.کرکی نیست که بتونه این مشکل رو رفع کنه.میخوام مولتی پلیر بازی کنم.
فقط باید سریال اوریجینال برای قسمت آنلاین خریدار بشه
سلام دوستان
من یه مشکل با قسمت the truth دارم
شماره سه اوئنجا که باید از رو عکس رمزشو پیدا کنی اصلا کار کردن با اون چیزی
که رمز رو وارد میکنی رو بلد نیستم !!!!
و کسی جای دقیق همه the truth رو میدونه؟
راهنمایی کنین ممنون میشم
من روی همین متن جواب کلاستر 10 رو پیدا کردم
همشو با یکم وقت میشد حل کرد اما شماره ده 1ساعت سعی کردم نشد تا تقلب کردم

فقط متاسفانه انگلیسی هست
مکان گلیف ها:
- Glyph Locations -
Centro District Glyphs
----------------------
-Building: Rosa in Fiore
-Description: The base of the Courtesans Guild (marked on your map). In the
northwest part of the Centro District.
-Location: On the northwest part of the building, on the face of a tower.
Climb up to the roof, then drop down from above.
-Notes: Can only be found AFTER the "High Stakes Negotiations" mission
-Building: Santa Maria Del Miracoli and Santa Maria Del Montesant
-Description: It's a large church-like building with a viewpoint tower. It's
located in the very northeastern part of the Centro District.
-Location: Look for the viewpoint tower. Climb it and drop over the north side
to find this Glyph.
-Building: Palazzo Senatorio
-Description: Very large mansion-like building up a long sloping path in the
very southeastern part of the Centro District. For PS3 users, this is where you
first find Copernicus if you have the DLC.
-Location: Of the three buildings, climb the one with the viewpoint tower, that
faces northwest. On the other side of it (that faces southeast), is where you
will find the Glyph.
-Building: Pantheon
-Description: Very large, hard-to-miss building in the center/eastern part of
the Centro District. Distinctive columns at the front.
-Location: Walk inside the main entrance and immediately turn right. Climb the
wall on your right and make your way into the arch above where you entered.
Turn on Eagle Vision and shimmy over to the Glyph to climb up into it.
Campagna District Glyphs
------------------------
-Building: Caserma Di Alviano
-Description: Bartolomeo's place. His barracks. That's pretty simple right?
-Location: The barracks are surrounded by protective walls. The Glyph is on
the outside of the eastern wall.
-Building: Castra Praetoria
-Description: The "main" French camp that you must infiltrate with Bartolomeo
to get to the Baron.
-Location: Go through the camp and go all the way to inner part of it, to the
northeast. As soon as you pass through the gate, this Glyph is on your right,
above a small hut.
Antico District Glyphs
----------------------
-Building: Colosseo
-Description: The legendary Roman Colosseum, kinda hard not to know what this
is, and it stands out pretty damn well too. In the center of the Antico.
-Location: At the very top of the Colosseum. Climb the outer wall. Look for
stones that jut out to go higher and higher. Get to the top and drop onto the
Glyph from above.
-Building: Aventino
-Description: A small village on top of a hill right between La Volpe's area
and the Colosseum.
-Location: This is on the north side of the Borgia Tower here. Climb the tower
and drop down on it from the north side.
-Building: Acquedotto Claudia
-Description: Part of the aqueduct just north of a small town in the southeast
part of the Antico District, near a Borgia Tower you can't access until later
in the game.
-Location: It's on the northern side of the aqueduct. It's on the stretch of
the aqueduct that's almost perfectly in line with the nearby Borgia Tower. Use
the tower itself to get high enough and climb onto the aqueduct. Then hang over
the edge where the Glyph is.
Vaticano District Glyphs
------------------------
-Building: Castel Sant'Angelo
-Description: It's the castello that Ezio has to infiltrate once in Sequence 4
and again in Sequence 8. It's in the Vaticano area.
-Location: In the castello grounds, there is that center tower that Ezio must
climb in Sequence 4. When you get on top of the ramparts, you can see the tower
just nearby, and on the south side is where the Glyph is
جواب ها:
--------------------------------------------------------------------------------
Cluster 1
--------------------------------------------------------------------------------
[1]
First, you get a picture puzzle. You must choose the right five to continue.
Solution: For future reference, number the pictures like this:
1 2 3 4 5
6 7 8 9 10
Your clue is "Masters all, they did not work, but ruled from on high." The
hint should be fairly obvious. You want to find images of people who are not
servants, but the served.
Solution: Choose 1, 3, 4, 8, 10
[2] Chessboard
You get a chessboard. You have to move one of the white pieces. You don't
really get a good clue here, but if you've ever played chess before, you might
imagine what the first move you might make is...
Soultion: Move E column Pawn two spaces forward.
[3] Quarantine Zone
In the final part, you must use the cursor to uncover a hidden red light and
scan it with X. There is a beep that indicates how close you are. When the
interval between beeps is shorter, you are much closer. When it is longer, you
are farther away.
Solution: Scan the top right
--------------------------------------------------------------------------------
Cluster 2
--------------------------------------------------------------------------------
[1] Slider Puzzles
Turn the outermost ring counterclockwise four times. Turn the next ring inward
three times counterclockwise. Turn the next ring twice clockwise. Turn the
last ring counterclockwise four times.
Turn the outermost ring counterclockwise twice. Turn the next one clockwise
once. Turn the next one clockwise five times. Turn the last ring clockwise
five times too. Go back to the second outer ring and turn it counterclockwise
five times.
Outermost clockwise once. Next clockwise five times. Next clockwise four times.
Last one clockwise three times.
[2] Chessboard
Your clue is "brother right beside brother". So you need to put another pawn
next to your current one. So that's either F or D.
Solution: Move the F Pawn forward two spaces.
[3] Quarantine Zone
Again, you must scan the screen for a red light. This time there are two. When
you select one, a timer starts (around the cursor) and you must find the other
one and select it before that runs out.
Solution: Slightly to the top-left, then close to the bottom right.
--------------------------------------------------------------------------------
Cluster 3
--------------------------------------------------------------------------------
[1] Pictures with Coordinates
This one takes a while. You are given some very vague clues that really take
a while to figure out. Along with that, some pictures you can zoom in on and
scan individually. Each time you scan something, you get coordinates. Pressing X
after that brings you to the code wheel. If you have the right coordinates, you
can break the code. So therefore, if you scanned the right part of the right
picture, you can break the code.
So what is the right scan point? Well, if you don't do it by process of
elimination, return to the clues. It has something to do with Washington. The
dollar seems like a great place to start but that's not it. The mountain in
the top right picture is Mt. Washington. Hmm... BELOW it is a building. Scan
the left flag of the building to find the right coordinates.
[2] Code Wheel
Now you'll have the code. Those familiar with AC2 remember the code wheels. This
one is a little different. You get the key above. 9 = the crossed out zero. 4 is
the backwards looking 5. And so on. Each individual pairing corresponds to one
pairing below. So when you align 9 and the crossed out zero, you can find the
first part of the code below. BUT it DOES NOT work for the others. To figure out
the next one, align 4 and that backwards 5. That will tell you what the second
part is. Get it? Align each part individually according to the code wheel, then
find the character that corresponds to the number below.
Solution:
2 = "backwards p/4" symbol
7 = Ø
9 = crossed out zero blackslash
8 = p/4-like symbol
[3] Chessboard
Your clue is "sacrificed". Obviously, as far as chess in concerned, this means
that one piece must be taken.
Solution: Move your F Pawn and take the black pawn in the E column.
[4] Quarantine Zone
For scanning, scan toward the bottom left then top-right.
--------------------------------------------------------------------------------
Cluster 4
--------------------------------------------------------------------------------
[1] Picture Puzzle
"These intelligent workers have no self control." That is your clue.
"Intelligent workers" obviously means some sort of computer or robot. So look
at the pictures and see what might correspond. It's still not easy though,
because some pictures are hard to decipher, leaving you guessing what might
be a computer/machine or not.
Solution: 2, 3, 5, 9, 10
[2] Slider Puzzle
Turn the centermost ring clockwise once. Turn the next ring four times
counterclockwise. Turn the next ring clockwise four times. Turn the outermost
ring clockwise once.
[3] Chessboard
The clue seems like nonsense, or it's just over my head. The only real thing
you can derive from it is the letter G, telling you which column the piece you
need to move is in. The rest should be easy.
Solution: Move G Pawn forward one space.
[4] Audio Puzzle
An audio puzzle. You have to select the right parts. When you click on a
section it is highlighted with a white border. You will notice the graph on
the right will change shape. You have to pick the right sections so that the
blue line overlays the white line perfectly.
Solution: Choose the first and second sections.
[5] Quarantine Zone
Scan up near the top-left, then directly below and slightly right.
--------------------------------------------------------------------------------
Cluster 5
--------------------------------------------------------------------------------
[1] Chessboard
The part you should pay attention to is not the part about the Vizier, but the
part about blocking the Templar advance. You'll notice that since we last saw
this board, there are a few changes. Most pertinent is the black queen that has
the white king in check. If you've ever played chess before, that's very bad.
You must find a piece that can slide in between them.
Solution: Take your Queen and slide it one space diagonally to the E column.
[2] Pictures and Coordinates
You get a bunch of pictures. You have to scan them by zooming in (X) and then
searching them for any interesting items. The correct object will give you the
coordinates for the next part. Hit X when you find it and see if you got them.
Your clue is the "bolt of electricity". Search each picture carefully for
something that seems relevant to that.
Solution: Scan the top left picture to find the electricity bolt
[3] Code Wheel
Now you get a code wheel with the coordinates you found.
The pattern is that each symbol on the wheel (what is on the wheel that is)
is opposite of a "related" symbol. For example, across from the horseshoe, is
a horseshoe with a little uh... "growth". Across from the semicircle, is a full
circle that's half filled. Get it?
So start by using the key like before to align 3 and the horseshoe. The NORMAL
horseshoe. We get 7 as the semicircle. Move on to the next pair. Remember, we
have to adjust the wheel for each symbol. So for the boxes that are crossed out,
align that with 5 on the code wheel. We have to find what 3 is and of course,
the symbol for 3 is missing.
But...! The symbol ACROSS from 3 isn't! That is the "///" symbol! So, flip
through the symbols you have. What is most closely related to "///"? Yes, it's
"////" with four slashes.
Now align the weird squiggly with 1. We need to find what 7 is when these are
aligned. Yet again, this is absent from the wheel. If you look to the opposite
side however, you see that double box crossed out shape. So what is the next
closest thing to that? The two empty boxes symbol. That is what 7 is.
Now the last one is easy. Just align "///" and 2 and you'll find out that 9 is
the crossed out boxes.
Solution:
7 = "Normal" semicircle
3 = ////
7 = [][]
9 = [X][X]
[4] Quarantine Zone
Not done yet sadly. Scan near the bottom left, very close to the bottom but
toward the right, and then middle right.
--------------------------------------------------------------------------------
Cluster 6
--------------------------------------------------------------------------------
[1] Pictures and Coordinates
The clues you get are actually decent, but unless you're zoomed in on the
pictures and literally cover them from corner to corner, you'll likely miss
the solution. Let's start with the second clue, about being left out of the
"spotlight". Downgrade this from a literal meaning and you can figure it
meaning, someone who's just not a prominent part of their picture. That can
easily apply to the bottom left, top right, and right pictures where we see
groups of people with some more focused than others. We need to narrow it down
a bit.
The first clue is what solves it if we look carefully enough. "Blown apart".
Nothing in the pictures is "blown apart", so we have to think a little more
about this. Look at the pictures and see. If you check the left most picture,
you'll see at the bottom left of it, a turret that that looks like it's from a
tank. Aha! Scan the guy who is standing right in front of the turret and you'll
see he is a Templar.
[2] Code Wheel
Scan that and take the coordinates to the scroll wheel. Here we go again. This
time, Shaun's advice actually helped me out a bit. There's obviously a pattern
here. Look at the numbers on the code wheel.
We have 0, 9, 13, a blank, 22, 27, another blank, 34, 42, and 42. Don't even
bother fumbling with the alignment just yet. Try to decipher this pattern.
Well, obviously, the difference between 9 and 0 is 9. And then the difference
between 13 and 9 is 4. Hmm, where do we see those numbers anywhere?
Yes! In the key! In the key, we see the bottom row of numbers are 9, 4, 7, and
2. Study the code wheel and note that the difference between the consecutive
numbers is the very NEXT number on the bottom part of the key! Use this to
figure out the blanks. Here's a demonstration:
0 (code wheel) + 9 (key) = 9 (code wheel)
9 (code wheel) + 4 (key) = 13 (code wheel)
13 (code wheel) + 7 (key) = 20 (code wheel blank)
20 (code wheel blank) + 2 (key) = 22 (code wheel)
Now go to the bottom row of numbers where you have to put in your answers. This
pattern continues for the grey numbers too!
22 (code wheel) + 5 (answers) = 27 (code wheel)
27 (code wheel) + 6 (answers) = 33 (code wheel blank)
Now you have the blanks filled in. Align the code wheel. We align 34 and 9,
and of course 5 is blank. But we now what is in between 13 and 22 on the code
wheel according to the math we just did. That is 20. 20 is the blank and it's
also what we must align with 4. So align that blank space between 13 and 22
with 4. 6 is given to us as 27. Now align 13 and 7. 1 is missing, but the space
is between 27 and 34. We did the math for that above. The answer is 33. That's
the second blank, so align that with 2 and we get 8 is 13.
Solution:
5 = 20
6 = 27
1 = 33
8 = 13
[3] Audio Puzzle
Now you get an audio puzzle. You have several broken segments to pick from. You
have to choose the exact ones to solve it.
Solution: Select first, second, fourth
[4] Chessboard
The clue is rather obvious. What piece is a "savior"?
Solution: The Knight is a savior! And it is also to be moved to F3.
[5] Quarantine Zone
Scan up near the top-right under the word Putin, close to the bottom left
amongst the sheet music, and to the far right on the guy's arm.
--------------------------------------------------------------------------------
Cluster 7
--------------------------------------------------------------------------------
[1] Picture Puzzle
The key here is "people". You need to find pictures that show examples of
Earth's various "elements" coming into contact or being utilized by humans.
That should easily narrow down the choices for you,
Solution: 2, 4, 7, 8, 10
[2] Pictures and Coordinates
You get a bunch of pictures for the start of a code wheel puzzle. You must find
the right item in these pictures that will give you the coordinates.
Solution: Scan Justice Roberts' left hand.
The other thing to look for is the presence of letters and numbers in the
pictures. They will greatly help you in figuring out the code next. In the
first picture next to the justices, there is a tiny "M" on the chalkboard, and
to the right, a very hard to see "9"
In the picture below it, you can barely see the letter "R" tucked behind the
American Flag. In the picture with Bush, you can see the letters "N" and "K" on
the tail of the jet, and the number "3" on the earmuffs of the guy in purple.
Near the cockpit of the jet, there is what looks like an obstructed "70" but it
is NOT. It is the top part of the letter "Z" and the number "0" Keep that in
mind! On the ground at their feet, there is the bottom part of the letter "Z".
In the last picture to the left, the letter "C" can be found in the framed
picture of an aircraft carrier.
[3] Code Wheel
So what does all of this mean? Well, if you look at the code wheel, you can see
that these numbers and letters go in the exact order that I just listed them
from the pictures.
Start with the blank between C and 9. That would be M from the first picture.
9 is also from the first picture and that's next. The next picture had R which
is also next. K, N, Z and 0 were all in the Bush picture as well as 3. The wheel
has the top part of "Z" but not the bottom part, so the blank must be the shape
that is the other part of "Z". And finally, C was found in the bottom left
picture.
So we know the blanks are M and 7.
Start aligning each part of the code wheel. When you haver K as 8, you are
given that 4 = C. You're also given the last one as 1 = K.
For the middle two, align that "R" looking shape with 0. 8 is blank, but we
now know that it is M. So find the M shape and put that in. Repeat this for
the almost "Z" shape, aligning it with 0. 2 lines up with the other blank, but
we know this is the other part of "Z". It sounds confusing but find the shape
that looks almost like a full "Z" but missing the very top part. That's your
last symbol.
Solution:
4 = C
8 = M
2 = "Z" shape that is almost complete except for the top
1 = K
[4] Chessboard
You have to "mimic" what the black pieces are doing. So pay attention to what
the text says the last move was which was to move its knight to C6. You have to
"mirror" this somehow.
Solution: More your B Knight to C3.
[5] Quarantine Zone
Scan near the top left under "Stevens", near the bottom right, and near the
top right.
--------------------------------------------------------------------------------
Cluster 8
--------------------------------------------------------------------------------
[1] Slider Puzzle
Select the outer and inner rings together. Turn them counterclockwise three
times. Next, select the outer and second inner ring together and turn them
clockwise once. Now just select the inner two rings and rotate them four times
clockwise.
[2] Audio Puzzle
Select 1, 5, 8, 9
[3] Chessboard
Think very carefully about the clues. The ones you want to focus on are "shift"
and "0-60". You should (hopefully) know the common linkage between these terms
is in cars. If you look closely at the chessboard, among all the weird pictures
on it, there are two of cars. However, only one piece can logically move onto
one of them.
Solution: Move King from E to F2
[4] Quarantine Zone
Scan near the top left, center bottom, bottom right, middle right, and near the
top right.
--------------------------------------------------------------------------------
Cluster 9
--------------------------------------------------------------------------------
[1] Picture Puzzle
Your clue is "vehicles that are faster than race cars." There's two parts to
dissecting this. First is to not take the word "vehicles" too literally. The
word as it is can mean a few things. Second, you need to think of something
that travels very fast. Like say... electrical signals? What do these pictures
have in common?
Solution: You need to pick pictures that have telephone lines in them. Select
2, 3, 6, 8, 10
[2] Audio Puzzle
Solution: Select 1, 3, 6, 12
[3] Chessboard
The clue is a little tough to decipher. The "she" might make you think you have
to work with your queen piece but that is not the case so ignore it. Instead,
pay attention to the words "slope," "narrow," and "adjacent". What piece can
move on a "slant"?
Solution: Move F Bishop to G2
[4] Quarantine Zone
Scan near each of the four corners but not quite in the corners, then middle
left.
--------------------------------------------------------------------------------
Cluster 10
--------------------------------------------------------------------------------
[1] Slider Puzzle
You'll want to hit up three times to select the outer ring and the second ring
from the center. Have those two selected and rotate any direction five times.
Hit down three times and you select the inner most ring and the third ring
together. Rotate them twice clockwise. Now hit up once to select the inner two
rings and rotate them twice clockwise. Done.
[2] Picture Puzzle
This was the only picture puzzle I didn't understand the "pattern" behind.
Something to do with revolutionary symbols? Well, the pictures you want, again
going left to right 1-5 and on the bottom 6-10 are 3, 4, 6, 8, and 10.
================================================================================
Thanks to three different people for tipping me about the secret to this above
mentioned picture puzzle. The clue is that they are not made by hands or by
machines. It's children, and in pictures 3, 4, 6, 8, and 10, you can see there
are kids in them. Thanks for the tips all!
================================================================================
[3] Pictures and Coordinates
This one took a while. The clue is the word ascends. If you can't find it, Shaun
gives another hint, about looking for something rising. Now for an actual
HELPFUL tip, know this: what you're looking for in the pictures is actually
hidden. You won't see it just by looking at the pictures unless you place the
scanner over it. So comb each photo carefully and look for something that only
shows up when you scan over it.
Give up? Check the top right photograph with the people in the plaza. Check the
sky above them. You'll see an Eagle. Scan it and hit X.
[4] Code Wheel
Now for the code wheel. If you just align the numbers at the top one by one,
you only get two freebies. When 8 on the outer wheel and 1 on the inner wheel
are lined up, you get 0 to be 5. When 5 and 5 are lined up, you get 8 to give
you 21. Now how to figure out the other numbers?
This was one that I sadly could not figure out alone. My friend and I sat around
writing out possible patterns and answers on paper until we finally figured it
out about 25 minutes later. See if you can notice the pattern yourself. Shaun
gives advice about paying attention to the ones and tens columns of the numbers.
If you want more hints, read on. If you want the solution, read even further,
but see if you can figure it out.
Well, you can easily discern a pattern with the numbers 2, 3, 5, 8, 13, and 21.
2+3=5. 3+5=8. 8+5=13 and so on. The pattern stops after 21 though. Ignore this.
Ignore this completely. There is a pattern but it's useful for solving this
puzzle.
There is another pattern though. Start with 13 and pay attention to the ones and
tens of 13, 21, and the number 24. There is a way that 13 and 21 make 24. But
how? Pay attention to the numbers individually instead of as a whole. Can they
somehow make 24? Think about it.
Here's the answer. Take the tens colum of 13 and 24. 1 and 2. Multiply them.
1x2=2. Now take the ones column numbers. 3 and 1. Add them. 3+1=4. Combine those
digits into a number. 24. There you go.
Let's try it again. Go to 45. Now look at the numbers right before it. 21 and
24. Multiply the tens and add the ones. 2x2=4. 1+4=45. Ok good, you got it,
right? Let's try and figure out what the first blank is then.
We know that the blank is made of the two numbers before it. So that would be
45 and 24. Multiply the tens and add the ones. 4x2=8. 4+5=9. 89. So the first
blank space is 89! Ok, we figured that out. Now for the next one.
We have that space as 89, and the next space requires that and 45. So do it
again as we've been doing. 4x8=32. 9+5=14. Now we have a problem though. It's
not 3214. No. Think of it again in terms of ones and tens. The 3 in 32 is
actually going to be a hundreds column number. The 2 then becomes a tens. But
the 1 in 14 is also a tens. So they add up. Here's a simple visual:
320
+ 14
¯¯¯¯
That comes out to 334. And that turns out to be the other missing space and the
final number.
Solution:
4 = 89
0 = 5
4 = 334
8 = 21
[5] Audio Puzzle
For the audio puzzle, just select every single part and you'll solve it.
[6] Quarantine Zone
For the scanning, there's a few dozen points here and they all go in a line.
Start from the bottom left and scan each one in a row. It'll take a minute but
you can easily follow the line as it goes around the screen and starts to curve.
Just know that you can't scan multiple points at once so tap X to get each one
in succession and make sure you don't accidentally pass over any.
کاربرانی که این قسمت را مشاهده میکنند
مجموع: 1 (اعضا: 0, مهمانها: 1)
 Google